
Author: Angus Roberts (angus@cs.man.ac.uk)
OilEd version: 3.3a
Document version: 1.0
OilEd is a simple editor that allows the user to create and edit OIL ontologies. The main intention behind OilEd is to provide a simple, freeware editor that demonstrates the use of, and stimulates interest in, DAML+OIL. OilEd is not intended as a full ontology development environment - it will not actively support the development of large-scale ontologies, the migration and integration of ontologies, versioning, argumentation and many other activities that are involved in ontology construction. It should, however, provide enough to allow the basic construction of OIL ontologies and demonstrate the power of the connection to the FaCT reasoner.
OilEd has been built by The Information Management Group, Department of Computer Science, University of Manchester, and is copyright University of Manchester. The original development of OilEd was supported by Interprice GmbH and the Free University of Amsterdam.
These are the aims of this guide:
These are NOT aims of the guide, and are the subject of other guides and resources:
To reiterate, we want to show you how to press the buttons in OilEd - not how to design and build models. Our example model is very contrived to make use of all OilEd's capabilities. It is not a good example of model design!
This guide assumes that:
This guide takes the form of a simple tutorial exercise, building a small (and contrived!) ontology of animals. The guide will show you how to create this ontology, how to add things to it, and how to perform reasoning. The guide has been written with the intention that you follow it step by step. We write examplesfor you to do follow this:
And other information like this:
We write tips and additional information like this. These are things that that may be useful or of interest, but which are not required to use OilEd.
Start OilEd by running the file oiled.bat in your installation directory, or by using any shortcut, icon or menu item you created during installation.
Create a new model, using the file menu. As soon as you have created a new model, save it somewhere safe:
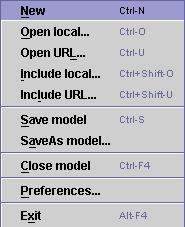
The file menu contains several options for opening, closing and saving models, shown and described below:
You should save your work frequently and regularly when using OilEd. You may also like to save consecutive versions of your work under different names (eg using some sequential numbering scheme). This is particularly necessary when you begin using the reasoner (see below), as this makes it easy to overwrite your model with a version altered by the reasoner
When you save, DAML+OIL is used by default as the representation format. Use the Export menu if you wish to save using a different format. Supported formats may vary, but can include documentation style HTML, Dotty (AT&T's grapher), RDFS, and the SHIQ and SHOQ(D) languages used by the FaCT reasoner
Ontologies can be included. When an ontology is included, any classes, properties and individuals not already in the ontology will be added along with their definitions. If information in the included ontology relates to an existing class (for example, the included ontology may also contain a definition for a particular class), that information will be added as an axiom if the existing class already has a definition. No attempt is made to prevent duplication, and no check is made at inclusion time that conflicts are not being introduced.
The main OilEd window contains two sets of tabs. Along the top is a set of tabs that allows you to switch between different aspects of the current model, and to switch to any plugins you may have installed:

Along the bottom is a tab that allows you to switch between several open models, and a message bar:

A small amount of information about your new model can be provided in the container tab. Switch to the container tab and add some details.
Click on the pen button to edit a field ![]()
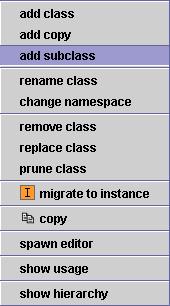
Classes are added in the Classes tab. The left hand pane is a list of your classes, and the right hand pane provides an editor for describing the selected class. Basic operations on the selected class are provided by a mouse menu in the class pane, as shown and described below:
We will build a small model of animals. First, we will add some animals. We will not add any description, other than to say that some of our animal classes are subclasses of others.
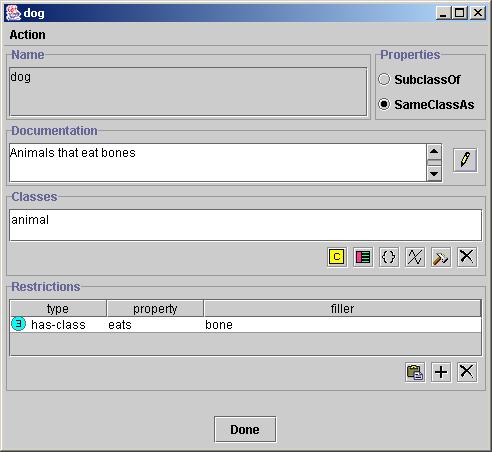
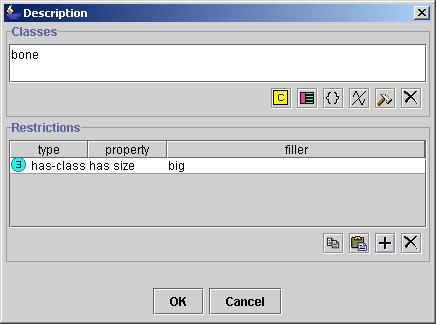
When a class is selected, you can describe it in the right hand class editor pane. You can also spawn this editor from the class pane mouse menu. A spawned editor is shown below, with a description of each element:
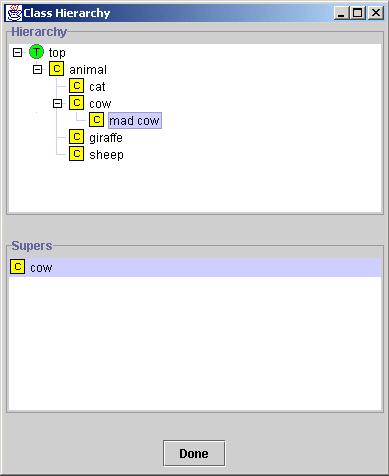
You can view the classes as a tree, in a class hierarchy view window. This has a pane containing the tree view, and one listing the superclasses of the class selected in the tree.
We want to describe some properties of our classes. Before we can do this, we must define the properties we will use.
Properties are added in the Properties tab. The left hand pane is a list of your properties, and the right hand pane provides an editor for describing the selected property. Basic operations on the selected property are provided by a mouse menu in the property pane, as shown and described below:

Add a couple of properties as follows:
You may describe several aspects of a property, such as super properties, inverses, domains, ranges, documentation, transitivity, in the right hand property editor, shown below:

Describe the properties you have just added:
In the above example we defined properties as having
ranges of DAML+OIL classes. DAML+OIL also supports property
ranges of XML Schema datatypes. OilEd has some support for this - if
you choose the "set datatype" option on the properties menu of a new
property, then the usual range toolbar is replaced with a datatype button:
![]() Selecting this
gives you a list of XML Schema datatypes to choose from.
Selecting this
gives you a list of XML Schema datatypes to choose from.
Now that we have some properties, we can start to describe classes. We will begin with a couple of simple class restrictions, using the restrictions panel of the class editor:
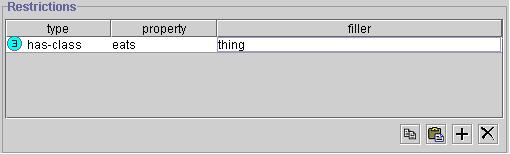
The restriction panel has four tool buttons:
| Copy restriction | |
| Paste restriction | |
| Add restriction | |
| Remove restriction |
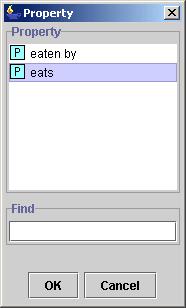
A restriction is made up of a property along which the class is restricted, the type of filler for the property, and a filler for the property. When you select "Add restriction", you are given a choice of properties along which to restrict the class:
Once you have chosen a property, you are asked to select a filler type:
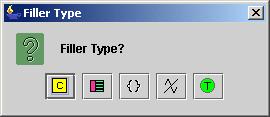
| Filler is a class | |
| Filler is a class description (frame) | |
| Filler is a set of individuals | |
| Filler is an expression | |
| Filler is of class Thing, i.e it can be anything |
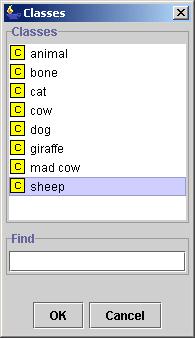
Most of these will be explained later. The simplest, which we will use now, is to allow a property to be filled with a class. If you select this, you will be given a class selector as shown below:
Now we will create some simple class descriptions:
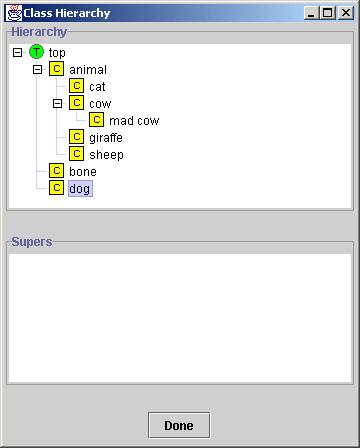
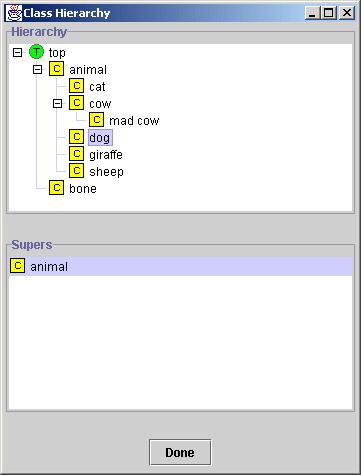
If you now open the class hierarchy viewer, you should have a hierarchy like the one below. Note that dog is not a subclass of animal, because we didn't describe it as such. We would like to use our description of animal and our description of dog to work out that dog is classified as a subclass of animal. To do this, we will use the reasoner.
In order to classify concepts according to the properties we have modelled, we need to connect OilEd to a reasoning service. This is provided by the FaCT reasoner, which is installed with OilEd.
Start FaCT by running the file reasoner.bat that you installed with OilEd, in [installation directory]\reasoner\win\scripts\Reasoner.bat. Alternatively, use the menu, icon or shortcut that you created at installation.
Starting FaCT opens up several windows. FaCT is implemented in Lisp with a CORBA interface. A Java server has been written to connect networked clients to the FaCT server. Hence the windows.
Once FaCT has been started, you must connect OilEd to it, before you can make use of its reasoning services. Use the five rightmost toolbar buttons to connect to and use FaCT:

To connect to FaCT:
The other buttons on the toolbar are used to control OilEd's interaction with FaCT, as listed below, and as explained by the small example following.
| Connect to FaCT | |
 |
Disconnect from FaCT |
| Verify model, asking reasoner to determine hierarchy | |
| Commit superclass relationships discovered by reasoner to model | |
| Forget superclass relationships discovered by reasoner |
If the reasoner finds any logical inconsistencies in your model, it will mark the inconsistent class as a red icon:
We will see an example of this when we look at axioms later.
If you know a little about DAML+Oil already, you may have spotted a small cheat we used to make this work. It is not only the description of dog that was used by the reasoner to classify it: the fact that we had set a property domain, i.e. an axiom, was also used. In general, such classification does not work unless you also use the SameClassAs property, to set conditions as necessary and sufficient. SameClassAs is described later in detail.
As well as defining classes, you can define individual members of classes in OilEd. Individuals may be members of previously defined classes, or of arbitrary classes defined using other tools such as the frame editor and the expression editor.
Individuals are added in the Individuals pane. A mouse menu is used to carry out operations on the currently selected individual. This is shown and described below:

We will add a new class and some individual members of that class to use later:
The expression and relations list panel allow editing of the individual's definition and a popup menu on the individual list allows addition, removal and renaming as with the class and property panels. Relations to other individuals can be added and removed. If a datatype property is selected, a datatype value can be entered. This must be explicitly typed. OilEd does not check that the values supplied are sensible.
It is sometimes useful to describe a filler by explicitly enumerating the individuals that can be used, as shown in this example:
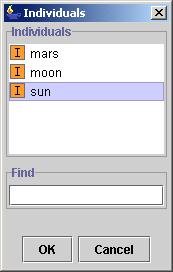
If wolves howled at mars as well, you could have selected a bigger set of both the moon and mars (or any other individual) by shift and ctrl clicking.
Anywhere you might use a class. A set describes a class by enumerating its membership. You can use a set for slot fillers, superclasses, property domains and ranges etc.
In the top right of the class editor pane, there are two radio buttons for setting properties of a class:
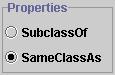
All the classes we have defined so far have used the default SubclassOf property. This is equivalent to saying that our descriptions are necessary conditions - all members of the class will necessarily meet these conditions.
This is not the same as saying that anything that meets these conditions will be a member of the class. SubclassOf conditions are not sufficient to define membership. For this, we need to use the SameClassAs property.
We can summarise the difference as:
SubclassOf |
SameClassAs |
| Necessary for class membership, but not sufficient to describe membership | Necessary for class membership, and sufficient to describe membership |
| Primitive class | Defined class |
This is explained in the following example and discussion:
In the first example, we had a description of wolf with a property of SubclassOf and a restriction of howls at moon. Because this description is SubclassOf, it is a necessary but not a sufficient condition. This means that all wolves will howl at the moon, but not everything that does so is a wolf: it is not sufficient to only howl at the moon to be a wolf.
Once we change wolf to SameClassAs in the second example, we are saying that our description is necessarily true of wolves, and a sufficient condition to describe wolves. All you have to do to be a wolf is meet this condition. So werewolves, by meeting this sufficient condition, are wolves.
OilEd defaults to using SubclassOf. So when should SameClassAs be used? This is an important decision in ontology design. SameClassAs is often referred to as a "defined" description, i.e. a complete definition. SubclassOf is often referred to as a "primitive" description, i.e. we either cannot or choose not to give it a complete definition. Instead, we give it a description by which it can be classified under other fully defined classes.
So far, we have used single classes and simple sets of individuals as fillers.
It is possible to use any arbitrary class description as a filler - using the
frame description editor, opened with the ![]() toolbar button and shown below.
toolbar button and shown below.
The example in this screenshot was made as follows:
We will create an arbitrary class of big bone and use it in our description of wolf:
Anywhere. Wherever you might use a class, you can create an anonymous class using the frame editor - slot fillers, superclasses, property domains and ranges, and to describe the class of individuals.
As well as the frame description editor, we can also use the OilEd expression editor
to create arbitrary expressions as fillers. Among other things, the expression editor
allows us to use negation, conjunction and disjunction to build complex expressions
combining classes, individuals, and frame descriptions. The expression editor is
opened with the ![]() toolbar button,
and is shown below:
toolbar button,
and is shown below:
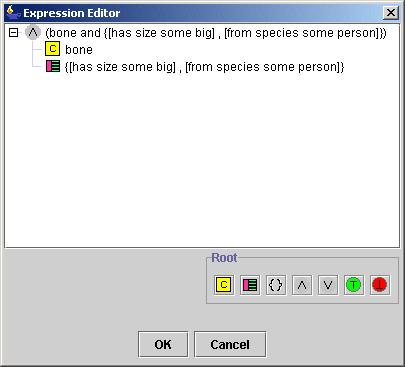
The editor uses a tree to display the structure of the expression - the example shows a conjunction with a class name and an arbitrary frame as arguments. Subexpressions can be expanded and collapsed using standard tree controls. The root of the expression can be reset using the buttons at the bottom of the screen (note that because these replace the root of the expression, they replace the entire expression):
| Class, picked from class selection list | |
| Frame, using frame description editor | |
| Set of individuals, picked from individuals selection list | |
| Conjunction - add arguments using the mouse menu (shown below) | |
| Disjunction - add arguments using the mouse menu (shown below) | |
| Thing - any class | |
| Nothing - no class |
A right button menu gives access to various operations on the selected part of the expression. The "add argument" menu allows arguments of various types to be added to conjunctions and disjunctions:

We will add a new restriction to werewolf, to say that they eat bones which are big and from person
As with frame descriptions, anywhere. Wherever you might use a class, you can create an arbitrary expression using the expression editor - slot fillers, superclasses, property domains and ranges, and to describe the class of individuals.
The above example could have been created as a single frame. In addition, simpler concepts could have been created and then composed together to make our final concept. As with much modelling, it is a matter of style and preference as to how you model particular concepts. Very complex expressions are not often seen. However, OilEd does open the expression editor when editing existing restrictions and other constructs - try right clicking any simple restriction and choosing "edit filler"
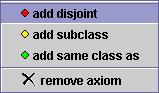
You can create several types of axioms within OilEd - statements which you define to be true of the classes in the ontology. Axioms are created in the axiom pane. A mouse menu is used to add axioms:
Properties of axioms are defined in the right hand pane.
We will demonstrate disjoint axioms by first making a deliberate mistake. We will create a new class lion and say that it eats something which is sheep and cow, when we should have said sheep or cow. We might think that the reasoner should spot this and say that lion is inconsistent:
lion has been successfully classified. This is because as far as the reasoner is concerned, something could be both a sheep and a cow at the same time, and a lion could eat such a thing. In order to say that sheep and cow are disjoint, we will add an axiom:
The reasoner now reports that lion is inconsistent. They can't eat things that are both sheep and cows at the same time. To correct this bug in our model, change the property restriction on lion:
Disjoint axioms are used to define subclasses as independent of one another, i.e. with no overlaps. As in other parts of OilEd, you don't have to make disjuncts between defined classes. Any arbitrary frame or expression will do.
Our hierarchy of animals is currently organised mainly by species. What if we wanted to organise animals along other axes? Or even along multiple axes? We can do this by introducing subclass axioms. These can be used to describe properties that are true of a class, but are not sufficient to define the class.
As an example, we will describe our animals' feet. We will then classify them along this axis using the reasoner:
You should now have a class hierarchy that includes the division of animals into hoofed and pawed. Now we will add a second axis, describing animal's wildness:
Your class hierarchy should now contain classifications along both axes.
When we define a class as SameClassAs, we are saying that all the conditions are both necessary and sufficient for membership of that class. What if we want to define some conditions that are only necessary for this same class? We use subclass axioms. In this way, we can use necessary and sufficient conditions (via the SameClassAs property) to define our main hierarchy of classes, and use necessary conditions (via subclass axioms) to define additional axes of classification.
Subclass axioms are also used to define concept covering. For "independent" concepts like animal, the list of primitive subclasses is usually incomplete: we would not pretend to have listed all subclasses of animal. For other concepts, particularly those that describe values, such as size, we might expect to provide a complete and mutually exclusive list of subclasses. We would model this by providing subclass axioms for all subclasses of the concept, and ensuring that they are disjoint by selecting the "disjoint" check box on the subclass axiom (which is equivalent to creating a separate disjoint axiom).
You can also define SameClassAs axioms - useful for defining equivalence
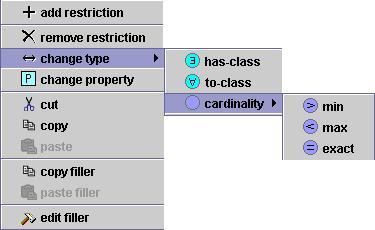
So far, all the restrictions we have used have been of type "has-class". There are other types of restriction. Restriction type can be changed by selecting a restriction and using the mouse menu:
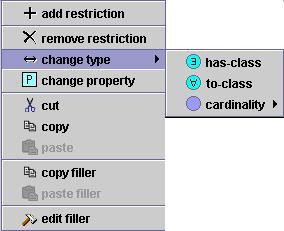
We will look at to-class restrictions in the following example, and at cardinality in the next section.
You will see that mad cow appears under vegetarian, though clearly they are not. This is because the has-class restriction is saying that vegetarians are things that eat plants, but does not say that this is all they eat. We need to change the restriction to a to-class one, saying that vegetarians are things that only eat plants:
Restriction types are equivalent to logical quantifiers. As you have probably guessed from the symbols used in OilEd, has-class is equivalent to existential quantification, and to-class is equivalent to universal quantification.
has-value |
to-class |
| existential | universal |
| Some slot has the value | Slot can only have the value, if it has a value |
We can also describe a restriction by its cardinality, allowing us to define the number of fillers a slot may have - maximum, minimum or exact number. This is done using the same change type menu as above, via the cardinality sub-menu:
For example, we could define the number of feet things can have:
The reasoner will behave sensibly with min, max and exact. So you could define a class of things with minimum 3 feet, and person would classify under it. Similarly, you could define things with more than one foot, and person would classify under it.
These are the bits of OilEd functionality we have not covered:
Here are some general papers and resources on ontology building:
If you are interested in the formal languages and their definitions, you can get full details of the DAML+Oil and Oil from: