Geodise Compute Toolbox
Introduction
The Geodise Compute Toolbox exposes the power of the Grid to the Jython scripting environment. With this toolbox the engineer can programmatically access Globus GT2 resources which provide the backbone of many computational Grids. In this manner the Geodise Compute Toolbox promotes the integration of Grid resources into the complex engineering workflows which can be described in the Python scripting language.
The Geodise Compute Toolbox provides Python functions which support the job submission, file transfer and certificate management in a familiar and intuitive syntax.
- Globus GRAM jobs can be submitted, queried and terminated.
- File transfer and remote directory management is supported using the GridFTP protocol.
- Single sign-on to the Grid is supported with Globus proxy certificates.
The Geodise Compute Toolbox functions for certificate management are listed in Table 1. Table 2 lists functions for the submission the computational jobs to a Globus GRAM service, and Table 3 lists the functions for GridFTP file transfer.
|
gd_certinfo |
Returns information about the user's certificate. |
|
gd_createproxy |
Creates a Globus proxy certificate. |
|
gd_proxyinfo |
Returns information about the user's proxy certificate. |
|
gd_proxyquery |
Queries whether a valid proxy certificate exists. |
|
gd_destroyproxy |
Destroys the local copy of the user's Globus proxy certificate. |
Table 1 Certificate management functions
|
gd_jobstatus |
Gets the status of a Globus GRAM job. |
|
gd_jobsubmit |
Submits a compute job to a Globus GRAM job manager. |
|
gd_jobpoll |
Queries the status of a Globus GRAM job until complete. |
|
gd_jobkill |
Kills a Globus GRAM job specified by a job handle. |
|
gd_chmod |
Changes file permissions of a file on a Globus resource. |
|
gd_submitunique |
Submits a GRAM job to a unique working directory. |
Table 2 GRAM job submission functions
|
gd_getfile |
Retrieves a remote file using GridFTP. |
|
gd_putfile |
Puts a file on a remote server using GridFTP. |
|
gd_transferfile |
Performs a third-party file transfer using GridFTP. |
|
gd_makedir |
Creates a remote directory using GridFTP. |
|
gd_listdir |
Lists the contents of a directory on a GridFTP server. |
|
gd_fileexists |
Tests the existence of files and directories on a Globus resource. |
|
gd_rmdir |
Deletes a remote directory using GridFTP. |
|
gd_rmfile |
Deletes a remote file using GridFTP. |
|
gd_rmuniquedir |
Deletes a remote directory and its contents. |
Table 3 GridFTP file transfer functions
Tutorial
Grid Certificates
To access Globus compute resources all users must be authenticated, and must also be authorised to access the resource. Authentication under the Globus toolkit is based upon X.509 certificates. X.509 certificates are digital tokens that have been cryptographically signed by a trusted third party, the Certificate Authority (CA), see Figure 1. Using X.509 certificates the identity of a user or server can be verified.
It is necessary to obtain a Grid certificate from a Certificate Authority that is acceptable to the administrators of the Globus resources that you wish to use. For step-by-step instructions about how to apply for an X.509 certificate, and how to export it into the format required by Compute Toolbox, a tutorial is available from the Geodise web-site ( http://www.geodise.org/files/tutorials/Obtaining_Certificates.pdf).
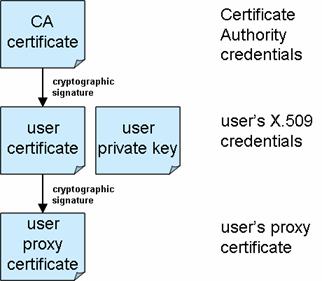
Figure 1 - Hierarchy of trust for user credentials
The Globus toolkit authorises users to access resources by mapping their certificate to a user account on the resource. Therefore to use a Globus resource to run computational jobs you must be in possession of an X.509 certificate signed by a CA that is trusted by the administrators of the resource that you wish to access. You must then apply for permission to access the resource by having the subject line of your certificate mapped to a user account on that machine.
To enable users to delegate their identity, allowing Grid processes to submit jobs and transfer files on their behalf, the Globus toolkit also uses a technology called ‘proxy certificates’. Proxy certificates are temporarily limited credentials that can be used to devolve the user’s identity across the Grid. In practice proxy certificates also provide a convenient single sign-on to the Grid; users enter the passphrase to the private key of their X.509 certificate just once when generating the proxy certificate.
Before accessing a Globus resource you should generate a valid proxy certificate, which will typically expire after 12 hours. The Geodise Compute Toolbox provides Python functions that allow the user to create, examine and destroy Globus proxy certificates within the Jython scripting environment.
Before using the Geodise Compute Toolbox you should configure the location of the credentials on your machine. Your X.509 certificate and corresponding private key should be separately encoded in PEM format (see the obtaining certificates tutorial for details). To do this create a file called ‘cog.properties’ located in a directory ‘.globus’ of the home directory on your workstation. Then configure the location of your X.509 certificate and private key, in addition to the certificates of trusted CAs.
For example the ‘cog.properties’ file on a Windows PC would contain the following lines:
cacert=C\:\\Documents and Settings\\<USER>\\.globus\\01621954.0
proxy=C\:\\DOCUME~1\\<USER>\\LOCALS~1\\Temp\\509up_u_<USER>
usercert=C\:\\Documents and Settings\\<USER>\\.globus\\usercert.pem
userkey=C\:\\Documents and Settings\\<USER>\\.globus\\userkey.pem
proxy.strength=512
proxy.lifetime=12
Please note that throughout this manual the term <USER> represents your username on any given machine.
The properties ‘usercert’ and ‘userkey’ refer to locations of the PEM encoded user certificate and corresponding private key. The file ‘cacert’ contains the certificate of the CA which signed the user’s X.509 certificate (in PEM format). Where ‘proxy’ will be the location of the user’s proxy certificate once it has been generated by gd_createproxy. The properties ‘proxy.strength’ and ‘proxy.lifetime’ contain default settings for the cryptographic strength and lifetime of the proxy certificate. Note that the file separator on a Windows PC must be defined with double backslashes, “\\”.
Once the user’s credentials have been configured in the ‘cog.properties’ file they are accessible to the Geodise Compute Toolbox. To verify the configuration from the interactive Jython prompt query the X.509 certificate:
>>> from gdcompute import *
>>> subject = gd_certinfo()
>>> print subject
subject: C=UK,O=eScience,OU=Southampton,L=SeSC,CN=some user
issuer: C=UK,O=eScience,OU=Authority,CN=CA,E=ca-operator@grid-support.ac.uk
start date: Tue Oct 07 13:00:31 BST 2003
end date: Wed Oct 06 13:00:31 BST 2004
/C=UK/O=eScience/OU=Southampton/L=SeSC/CN=some user
The details of the user’s certificate are printed to the screen. The subject line returned by gd_certinfo is in the Globus format and can be used to apply for access to a Globus resource. By supplying this subject line to the administrator of a Globus resource your credentials can be mapped to a user account on that machine.
To create a proxy certificate the gd_createproxy command is used:
>>> gd_createproxy()
When this command is entered a GUI will prompt the user for the passphrase to their private key. The details of the proxy certificate can be configured using the 'Options' button. The proxy certificate is generated by pressing the 'Create' button. After the proxy has been generated, click 'Cancel' to dismiss the GUI.
Now you may query the details of the proxy certificate:
>>> (exists, subject) = gd_proxyinfo()
Subject: C=UK,O=eScience,OU=Southampton,L=SeSC,CN=some user,CN=proxy
issuer: C=UK,O=eScience,OU=Southampton,L=SeSC,CN=some user
type: full legacy globus proxy
strength: 512 bits
timeleft: 11 h, 59 min, 39 sec
The details printed to the screen indicate that the proxy certificate will remain valid for almost 12 hours. We may also query the validity of the proxy certificate programmatically, for example:
>>> isvalid = gd_proxyquery('time',11)
>>> print isvalid
1
This indicates that our proxy certificate will remain valid for at least 11 hours.
Job submission and file transfer
The primary services offered by Globus GT2 resources are GRAM job submission and GridFTP file transfer. Typically Globus resources can simply be specified by the machine name, for example:
>>> host = 'server1.domain.com'
However some Globus computational resources may offer GRAM job submission to a number of alternative job managers or non-default ports. These can be specified as follows:
>>> GRAM1 = 'server1.domain.com/jobmanager-fork'
>>> GRAM2 = 'server1.domain.com/jobmanager-pbs'
>>> GRAM3 = 'server1.domain.com:2119/jobmanager'
Globus resources offering GridFTP will typically listen on the default port (2811), however a non-default port can be specified as follows:
>>> GridFTP1 = 'server1.domain.com:2812'
For all examples in this tutorial we will assume that a single Globus resource (host) is used offering GRAM and GridFTP services on default ports, and using the default job manager.
To submit a job to a computational resource via a Globus GRAM service you must describe the attributes of the job using a Resource Specification Language (RSL) string. An RSL string is a list of property/values pairs each enclosed by brackets (see the example below). The most frequently used GRAM RSL parameters are listed in Table 4, these and other GRAM RSL parameters are further documented on the Globus website (http://www.globus.org/).
|
executable |
The name of the executable file to be run. This is the only required parameter. |
|
directory |
The name of the default working directory. |
|
arguments |
The arguments to be passed to the executable. |
|
stdin |
The name of the file containing the standard input for the executable. |
|
stdout |
The name of the file that will contain the standard output from the executable. |
|
stderr |
The name of the file that will contain the standard error from the executable. |
|
count |
The number of times that the executable should be executed. |
|
environment |
The environment variables to be set. A list of name/value pairs each enclosed by brackets. |
|
maxTime |
The maximum execution time in minutes. |
|
jobType |
A string specifying the job types. Possible values include “single”, “multiple”, “mpi” and “condor”. |
Table 4 GRAM RSL parameters
This example demonstrates the submission of a simple job to the Globus GRAM service on host. The first argument to gd_jobsubmit is an RSL string that specifies the file name of the executable to be run, ‘sleep’, and the argument to be passed to that executable which specifies that the process will sleep for 1 minute.
>>> rsl = '&(executable="/bin/sleep")(arguments="1m")'
>>> jobhandle = gd_jobsubmit(rsl,host)
>>> print jobhandle
https://server1.domain.com:30001/27531/1096385757/
The function gd_jobsubmit returns a GRAM job handle that can be used to check the status of the job, and if necessary to kill the job. In the following example we use the job handle returned by gd_jobsubmit to query the status of the job. The integer returned by gd_jobstatus indicates the state of the job, where “2” indicates that the job is active and “3” indicates that the job has completed.
>>> status = gd_jobstatus(jobhandle)
>>> print status
2
We can also poll the status of the job until the job has completed.
>>> isdone = gd_jobpoll(jobhandle)
In addition to high-performance, high-volume file transfer GridFTP offers all of the standard FTP file operations. We can use GridFTP to create a working directory on the Globus resource.
>>> gd_makedir(host,'/home/<USER>/demo')
We will now run a second job, piping the output to a file ‘date.out’ in our working directory on host. We will then use the GridFTP command gd_getfile to retrieve the output to a temporary file on the local machine, and print the results.
>>> import tempfile
>>> rsl = '&(executable="/bin/date")(arguments="-u") (directory="/home/<USER>/demo")(stdout="date.out")'
>>> jobhandle = gd_jobsubmit(rsl,host)
>>> print jobhandle
https://server1.domain.com:30001/27531/1096385757/
>>> gd_jobpoll(jobhandle)
>>> localfile = tempfile.mktemp()
>>> gd_getfile(host,'/home/<USER>/demo/date.out',localfile)
>>> print open(localfile).read()
Tue Sep 28 16:46:25 BST 2004
We can now use the GridFTP commands gd_rmfile and gd_rmdir to clean-up the file and directory on the server:
>>> gd_rmfile(host,'/home/<USER>/demo/date.out')
>>> gd_rmdir(host,'/home/<USER>/demo/')
Frequently an engineer may wish to submit and run several jobs independently upon a Globus resource, for example when conducting a parameter sweep. To prevent conflicts between the input and output parameters of the different jobs it is convenient to run the jobs in separate directories. The function gd_submitunique handles the submission of compute jobs into unique directories, returning a job handle and the path of the unique directory. In the following example we use the function gd_submitunique to submit two concurrent jobs, we will then retrieve the results and delete unique directories and their contents using gd_rmuniquedir.
>>> rsl = '&(executable="/bin/date")(arguments="-u") (stdout="date.out")'
>>> (jobhandle1,uniquedir1) = gd_submitunique(rsl,host, remotedir='/home/<USER>/')
>>> (jobhandle2,uniquedir2) = gd_submitunique(rsl,host, remotedir='/home/<USER>/')
>>> print jobhandle1; print uniquedir1
>>> print jobhandle2; print uniquedir2
https://server1.domain.com:30002/27658/1096386586/
/home/<USER>/20040928T164946_176266/
https://server1.domain.com:30002/27671/1096386587/
/home/<USER>/20040928T164947_405706/
>>> gd_jobpoll(jobhandle1)
>>> localfile = tempfile.mktemp()
>>> gd_getfile(host,uniquedir1+'date.out',localfile)
>>> print open(localfile).read()
>>> gd_rmuniquedir(host,uniquedir1)
Wed Sep 29 12:12:21 UTC 2004
>>> gd_jobpoll(jobhandle2)
>>> localfile = tempfile.mktemp()
>>> gd_getfile(host,uniquedir2+'date.out',localfile)
>>> print open(localfile).read()
>>> gd_rmuniquedir(host,uniquedir2)
Wed Sep 29 12:12:23 UTC 2004
Scripting the Grid
The Geodise Compute Toolbox allows engineers to script Grid processes in the Jython scripting environment. Unfortunately due to the dynamic nature of the Grid the resources that you wish to use may become unavailable, or may be more or less reliable. In these situations, when a function in the Geodise Compute Toolbox is unable to complete its operation, the function will typically throw an exception with a diagnostic message.
>>> gd_getfile(host,'\tmp\fileDoesNotExist.txt','demo.txt')
Traceback (innermost last):
File "<console>", line 1, in ?
File "gdcompute.py", line 348, in gd_getfile
GridFTPError: Server refused performing the request.
Custom message: (error code 1) [Nested exception message:
Custom message: Unexpected reply: 550
\tmp\fileDoesNotExist.txt: No such file or directory.]
If a Python function throws an error that is not suitably handled, this will cause the Python script or function which invoked it to stop executing. Therefore it is important if you wish to write a robust Python script or function that communicates with the Grid that you use Python exception handling to deal with errors appropriately if and when they occur.
Python exception handling is based upon try, except statements. Placing a block of code between a pair of try, except statements means that if an exception occurs when Jython evaluates this code the script will not stop executing. Instead the code inside the except block is evaluated and the script continues. This behaviour is demonstrated by the example below.
>>> try:
... gd_getfile(host,'\tmp\fileDoesNotExist.txt','demo.txt')
... except Exception, e:
... print 'An error has occurred with the following message:'
... print e
...
An error has occurred with the following message:
Server refused performing the request.
Custom message: (error code 1) [Nested exception message:
Custom message: Unexpected reply: 550
/tmp/fileDoesNotExist.txt: No such file or directory.]
In this way errors that occur when communicating with the Grid can be ‘caught’ by the script and dealt with appropriately. Exceptions can be classified depending upon their type, and if appropriate the script can continue, or stopped by throwing another exception (using raise).
We recommend that when writing a script or function that communicates with the Grid that you enclose all Grid functions with try, except statements. You should also consider how the script should behave if an error occurs; should it tidy up and exit, or should it continue? This way you will be prepared for the unexpected, and your Python scripts and functions will be more robust as a result.
Copyright © 2005, The Geodise Project, University of Southampton